

How many of you have gotten instability from hdmi on the Raspberry Pi?! Especially with a HDMI to VGA adapters not powered.
Well... we'll hand over to you the solution!
Some time ago we have published a fix for usb power, it was a solution for all devices that you would like to connect to RaspberryPi.
Now, we extend the past project and we can add the fix that we're talking about.
The components that we have to solder in the schematic are minimals and ordinary.
They are:
- 2PCS 5.6 ohm 1/4W resistors
- 1PCS 10 ohm 1/4W resistor
- 1PCS LM317
These are the connections of schematic.
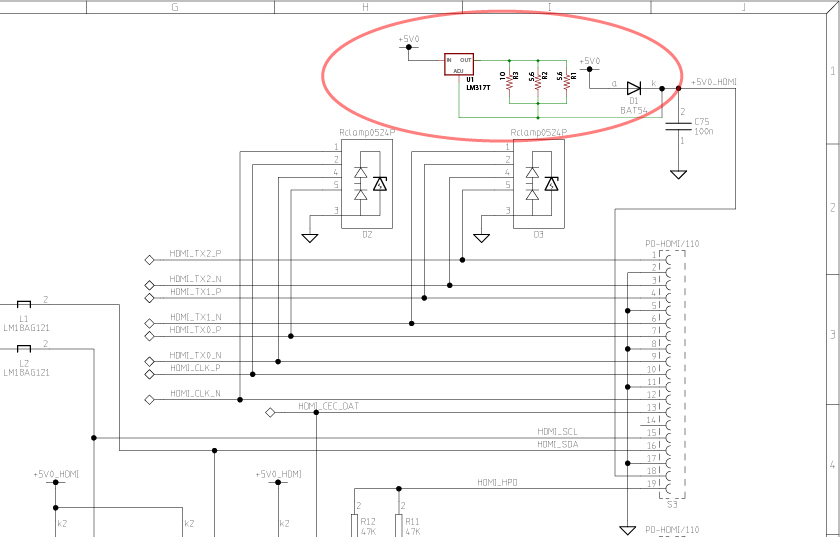
In a few words, the LM317 is set up like current regulator to flow about 550mA to pin 18 of RaspberryPi HDMI port, that is to power the correct level of current to the device connected.
All resistors are connected in parallel from pin ADJ to pin OUT of LM317. If you want more or less current you can add or remove the value that you want in relation with the formula:
Iout = 1.2 / Rc
where Rc is the value of resistor parallel.
There are two join points on RaspberryPi, the first one on 5V out from MicroUSB and the second one on the output from diode BAT54. There aren't risks, because the last selected join point is on catode side and the diode on RaspberryPi allows only a minimal inverse current negligible from the current booster to the board.
Now all your future problems on HDMI port are solved!!
No other edit to configuration file is necessary No more...
That's all, I leave you to the assembling pictures.
See you next time Foxes.


No comments:
Post a Comment
Hi at all, leave me a feedback for this post. Thx